이 글은 인프런 강의 'Airflow 마스터 클래스'를 듣고 작성한 글이다.
Postgres Hook
이전 포스팅 (2024.07.27 - [Minding's Programming/Knowledge] - [Airflow] Connection과 Hook)에서 살펴보았듯이 Hook은 여러 외부 서비스를 이용할 때 개인정보를 코드에 기입할 필요없이 편리하게 이용하게 해주는 Airflow의 기능 중 하나다.
그 중 bulk_load는 탭으로 나뉘어진 파일을 DB table에 업로드할 수 있도록하게 해주는 메서드인데, 공식문서에 따르면 아래와 같은 형식을 파라미터 인자값으로 받는다. (공식 문서: https://airflow.apache.org/docs/apache-airflow-providers-postgres/5.11.2/_api/airflow/providers/postgres/hooks/postgres/index.html)
[docs]    def bulk_load(self, table: str, tmp_file: str) -> None:
        """Load a tab-delimited file into a database table."""
        self.copy_expert(f"COPY {table} FROM STDIN", tmp_file)


[docs]    def bulk_dump(self, table: str, tmp_file: str) -> None:
        """Dump a database table into a tab-delimited file."""
        self.copy_expert(f"COPY {table} TO STDOUT", tmp_file)

[docs]    def copy_expert(self, sql: str, filename: str) -> None:
        """
        Execute SQL using psycopg2's ``copy_expert`` method.

        Necessary to execute COPY command without access to a superuser.

        Note: if this method is called with a "COPY FROM" statement and
        the specified input file does not exist, it creates an empty
        file and no data is loaded, but the operation succeeds.
        So if users want to be aware when the input file does not exist,
        they have to check its existence by themselves.
        """
        self.log.info("Running copy expert: %s, filename: %s", sql, filename)
        if not os.path.isfile(filename):
            with open(filename, "w"):
                pass

        with open(filename, "r+") as file, closing(self.get_conn()) as conn, closing(conn.cursor()) as cur:
            cur.copy_expert(sql, file)
            file.truncate(file.tell())
            conn.commit()
bulk_load() 함수를 살펴보면 table명과 업로드 대상 파일을 인자로 받은 뒤 결국 copy_expert()라는 함수가 실행된다는 것을 알 수 있다.
copy_exper()는 file을 연 다음 get_conn() 함수를 통해 DB와 서버를 연결하는 세션을 만들고 closing 라이브러리를 통해 커서를 움직여 conn.cursor() 내 또 다른 copy_expert() 함수를 실행시킨다.

https://www.psycopg.org/docs/cursor.html
The cursor class — Psycopg 2.9.10.dev1 documentation
Allows Python code to execute PostgreSQL command in a database session. Cursors are created by the connection.cursor() method: they are bound to the connection for the entire lifetime and all the commands are executed in the context of the database session
www.psycopg.org
psycopg2의 공식 문서에 따르면 해당 함수의 파라미터는 spl, file, size이며(bulk_load 함수에서는 spl과 file 두 가지만 받는다.) 데이터를 내보낼 때에는 sql 파라미터에 'COPY {table명} TO STDOUT'을, 임포트(업로드)할 때에는 'COPY {table명} FROM STDIN'을 적어줘야한다고 한다. 그리고 파일은 반드시 읽을 수 있는 형태여야 한다고 한다.
Postgres Hook의 bulk_load 함수 이용한 DAG 만들기
from airflow import DAG
import pendulum
from airflow.operators.python import PythonOperator
from airflow.providers.postgres.hooks.postgres import PostgresHook

with DAG(
        dag_id='dags_python_with_postgres_hook_bulk_load',
        start_date=pendulum.datetime(2023, 4, 1, tz='Asia/Seoul'),
        schedule='0 7 * * *',
        catchup=False
) as dag:
    def insrt_postgres(postgres_conn_id, tbl_nm, file_nm, **kwargs):
        postgres_hook = PostgresHook(postgres_conn_id)
        postgres_hook.bulk_load(tbl_nm, file_nm)

    insrt_postgres = PythonOperator(
        task_id='insrt_postgres',
        python_callable=insrt_postgres,
        op_kwargs={'postgres_conn_id': 'conn-db-postgres-custom',
                   'tbl_nm':'TbCorona19CountStatus_bulk1', # 현재 해당 테이블이 없는 상태
                   'file_nm':'/opt/airflow/files/TbCorona19CountStatus/{{data_interval_end.in_timezone("Asia/Seoul") | ds_nodash}}/TbCorona19CountStatus.csv'}
    )
Postgres Hook을 import해준 뒤 지난 번 처럼 connection id를 통해 Postgres DB와 연결할 정보들을 넘겨준다. 그리고 bulk_load()를 통해 업로드할 csv파일의 경로와 테이블의 이름도 지정해준다.(아직 테이블이 없는 상태)
그리고 해당 DAG을 업로드해준 뒤 실행해보자.

위와 같은 에러메시지가 로그에 노출되는 것을 확인할 수 있다. 해당 에러는 'tbcorona19countstaturs_bulk1'이라는 테이블 명이 DB 내 존재하지 않는다는 의미와 같다. 즉, Postgres Hook의 bulk_load() 함수를 이용하기 위해서는 미리 테이블을 만들어줘야 한다는 문제가 생긴다.
이와 같이 Postgres hook 내의 bulk_load() 함수는 다음과 같은 문제점이 발견된다.
- Load 가능한 파일은 오직 Tab으로 구분된 파일(, 등으로 구분된 csv 파일은 인식 못함)
- Header까지 포함되어 업로드됨
- 특수문자로 인해 파싱이 안될 경우 에러 발생
- 대상 테이블이 없는 경우 직접 테이블 생성해줘야 함
이런 문제점을 해결하기 위해서는 어떻게 해야할까? Airflow의 가장 큰 장점인 커스텀화를 이용해 Hook을 직접 만들면 해결할 수 있다.
Custom Hook으로 bulk_load 해보기
Custom Hook에서는 위의 문제점을 해결하기 위해 다음과 같은 개선방안을 포함시킬 것이다.
- Delimiter(구분) 유형을 입력받게 함
- Header 포함여부 선택
- 특수문자 제거하는 로직 추가
- splalchemy를 이용해 Load하고, 테이블을 생성하면서 업로드할 수 있도록 제작
Custom Hook 또한 Custom Operator를 만들 때와 같이 BaseHook이라는 클래스를 상속받아 만든다. 아래 공식 문서 링크를 참고하자.
https://airflow.apache.org/docs/apache-airflow/stable/_api/airflow/hooks/base/index.html
airflow.hooks.base — Airflow Documentation
airflow.apache.org
공식 문서에 따르면 get_connections, get_connection, get_hook, get_conn 등의 메서드가 있다.
[docs]class BaseHook(LoggingMixin):
    """
    Abstract base class for hooks.

    Hooks are meant as an interface to
    interact with external systems. MySqlHook, HiveHook, PigHook return
    object that can handle the connection and interaction to specific
    instances of these systems, and expose consistent methods to interact
    with them.

    :param logger_name: Name of the logger used by the Hook to emit logs.
        If set to `None` (default), the logger name will fall back to
        `airflow.task.hooks.{class.__module__}.{class.__name__}` (e.g. DbApiHook will have
        *airflow.task.hooks.airflow.providers.common.sql.hooks.sql.DbApiHook* as logger).
    """

    def __init__(self, logger_name: str | None = None):
        super().__init__()
        self._log_config_logger_name = "airflow.task.hooks"
        self._logger_name = logger_name

    @classmethod
[docs]    def get_connections(cls, conn_id: str) -> list[Connection]:
        """
        Get all connections as an iterable, given the connection id.

        :param conn_id: connection id
        :return: array of connections
        """
        warnings.warn(
            "`BaseHook.get_connections` method will be deprecated in the future."
            "Please use `BaseHook.get_connection` instead.",
            RemovedInAirflow3Warning,
            stacklevel=2,
        )
        return [cls.get_connection(conn_id)]


    @classmethod
[docs]    def get_connection(cls, conn_id: str) -> Connection:
        """
        Get connection, given connection id.

        :param conn_id: connection id
        :return: connection
        """
        from airflow.models.connection import Connection

        conn = Connection.get_connection_from_secrets(conn_id)
        log.info("Using connection ID '%s' for task execution.", conn.conn_id)
        return conn


    @classmethod
[docs]    def get_hook(cls, conn_id: str) -> BaseHook:
        """
        Return default hook for this connection id.

        :param conn_id: connection id
        :return: default hook for this connection
        """
        connection = cls.get_connection(conn_id)
        return connection.get_hook()


[docs]    def get_conn(self) -> Any: # 자식 클래스에서 직접 구현 필요 (DB 연결이 담긴 세션)
        """Return connection for the hook."""
        raise NotImplementedError()
소스코드를 살펴보면, @classmethod 라는 데코레이터를 발견할 수 있다. 이 데코레이터의 의미는 class를 객체로 만들지 않아도 해당 클래스의 메서드를 직접 쓸 수 있다는 뜻이다.
# @classmethod 사용 시
import BaseHook
b = BaseHook.get_connections(conn_id)

# 사용하지 않을 시
import BaseHook
a = BaseHook() # 객체화
b = a.get_connections(conn_id)
Custom Hook 개발
Custom Hook 개발 전에 앞서 /plugins의 하위 폴더로 hooks 폴더를 생성해주자.
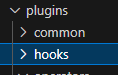
지난 번 Custom Operator를 만들 때와 마찬가지로 /plugins 폴더 내에 파일이 위치해야 airflow가 해당 Hook을 인식할 수 있기 때문이다.
from airflow.hooks.base import BaseHook
import psycopg2
import pandas as pd

class CustomPostgresHook(BaseHook): # BaseHook 상속

    def __init__(self, postgres_conn_id, **kwargs): # 생성자에서는 postgres에 대한 connection id만 인자값으로 받음
        self.postgres_conn_id = postgres_conn_id

    def get_conn(self): # get_conn() 함수 재정의: get_connection() 메서드 이용해 정보 받아옴
        airflow_conn = BaseHook.get_connection(self.postgres_conn_id)
        self.host = airflow_conn.host
        self.user = airflow_conn.login
        self.password = airflow_conn.password
        self.dbname = airflow_conn.schema
        self.port = airflow_conn.port

        # 위에서 받아온 정보를 토대로 psycopg2 이용해 DB와의 연결 세션 생성
        self.postgres_conn = psycopg2.connect(host=self.host, user=self.user, password=self.password, dbname=self.dbname, port=self.port)
        return self.postgres_conn # 해당 세션을 return

    # bulk_load() 함수 생성: 테이블 이름, 파일 이름, 구분형식, 헤더 포함여부, 기존 데이터 삭제여부를 인자로 받음
    def bulk_load(self, table_name, file_name, delimiter: str, is_header: bool, is_replace: bool):
        from sqlalchemy import create_engine

        self.log.info('적재 대상파일:' + file_name)
        self.log.info('테이블 :' + table_name)
        self.get_conn()
        header = 0 if is_header else None                       # is_header = True면 0, False면 None
        if_exists = 'replace' if is_replace else 'append'       # is_replace = True면 replace, False면 append
        file_df = pd.read_csv(file_name, header=header, delimiter=delimiter)

        for col in file_df.columns:
            try:
                # string 문자열 칼럼이 아닐 경우 continue
                file_df[col] = file_df[col].str.replace('\r\n','')      # 줄넘김 및 ^M 제거
                self.log.info(f'{table_name}.{col}: 개행문자 제거')
            except:
                continue

        self.log.info('적재 건수:' + str(len(file_df)))
        uri = f'postgresql://{self.user}:{self.password}@{self.host}/{self.dbname}'
        engine = create_engine(uri) # sqlalchemy 기능
        file_df.to_sql(name=table_name,
                            con=engine,
                            schema='public',
                            if_exists=if_exists,
                            index=False
                        )
코드는 위와 같이 작성했다. get_conn() 함수를 BaseHook의 get_connection() 함수를 이용해 Postgres DB 연결에 필요한 정보를 받아온 뒤 psycopg2를 통해 연결 세션을 반환해줬고, bulk_load() 또한 위에서 이야기한 개선사항을 반영해 만들었다.
이제 위 Custom Hook을 활용한 DAG을 만들어보자.
from airflow import DAG
import pendulum
from airflow.operators.python import PythonOperator
from hooks.custom_postgres_hook import CustomPostgresHook

with DAG(
        dag_id='dags_python_with_custom_hook_bulk_load',
        start_date=pendulum.datetime(2023, 4, 1, tz='Asia/Seoul'),
        schedule='0 7 * * *',
        catchup=False
) as dag:
    def insrt_postgres(postgres_conn_id, tbl_nm, file_nm, **kwargs):
        custom_postgres_hook = CustomPostgresHook(postgres_conn_id=postgres_conn_id)
        custom_postgres_hook.bulk_load(table_name=tbl_nm, file_name=file_nm, delimiter=',', is_header=True, is_replace=True)

    insrt_postgres = PythonOperator(
        task_id='insrt_postgres',
        python_callable=insrt_postgres,
        op_kwargs={'postgres_conn_id': 'conn-db-postgres-custom',
                   'tbl_nm':'TbCorona19CountStatus_bulk2',
                   'file_nm':'/opt/airflow/files/TbCorona19CountStatus/{{data_interval_end.in_timezone("Asia/Seoul") | ds_nodash}}/TbCorona19CountStatus.csv'}
    )
custom hook을 불러와 bulk_load() 함수까지 실행하는 insrt_postgres() 함수를 만들어주고 PythonOperator를 통해 해당 함수를 실행시켜주었다.
이후 DAG을 실행한 뒤, DBeaver를 통해 DB를 확인해보았다.
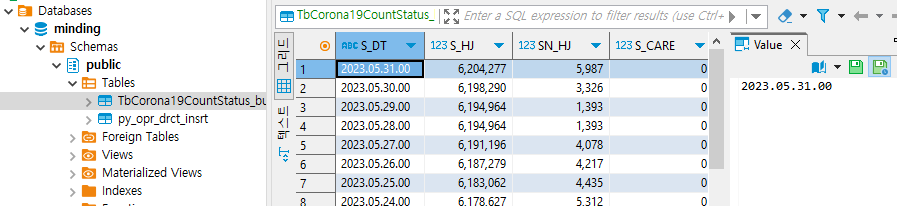
해당 테이블을 생성하지 않은 상태였는데도 새로 생성된 것을 볼 수 있으며, 정상적으로 데이터가 업로드되었다. (판다스 데이터프레임의 칼럼 타입과 형태로 그대로 테이블 생성됨)
'Minding's Programming > Airflow' 카테고리의 다른 글
| [Airflow] Airflow의 기본 센서 (BashSensor, FileSensor, PythonSensor) (0) | 2024.07.31 |
|---|---|
| [Airflow] Connection Type 신규 추가하는 방법 (0) | 2024.07.31 |
| [Airflow] Connection과 Hook (0) | 2024.07.27 |
| [Airflow/Docker] Postgres 컨테이너 추가해 DB 접속하기 (0) | 2024.07.26 |
| [Airflow/Docker] Docker-compose.yaml 파일 해석 (0) | 2024.07.26 |