728x90
반응형
이 글은 아래 영상을 참고했다.
https://www.youtube.com/watch?v=MKrubv0dmKw&list=PLz2iXe7EqJOMp5LozvYa0qca9E4OBkevW&index=10
목표
- 캐릭터(객체 or 이미지)끼리 닿았을 때, 점수가 올라가도록 만들기
- 게임화면에 글자가 표시되도록 만들기
게임화면에 텍스트 표시하는 법
기존 코드가 너무 길기 때문에 텍스트 표시하는 법부터 따로 배워본다.
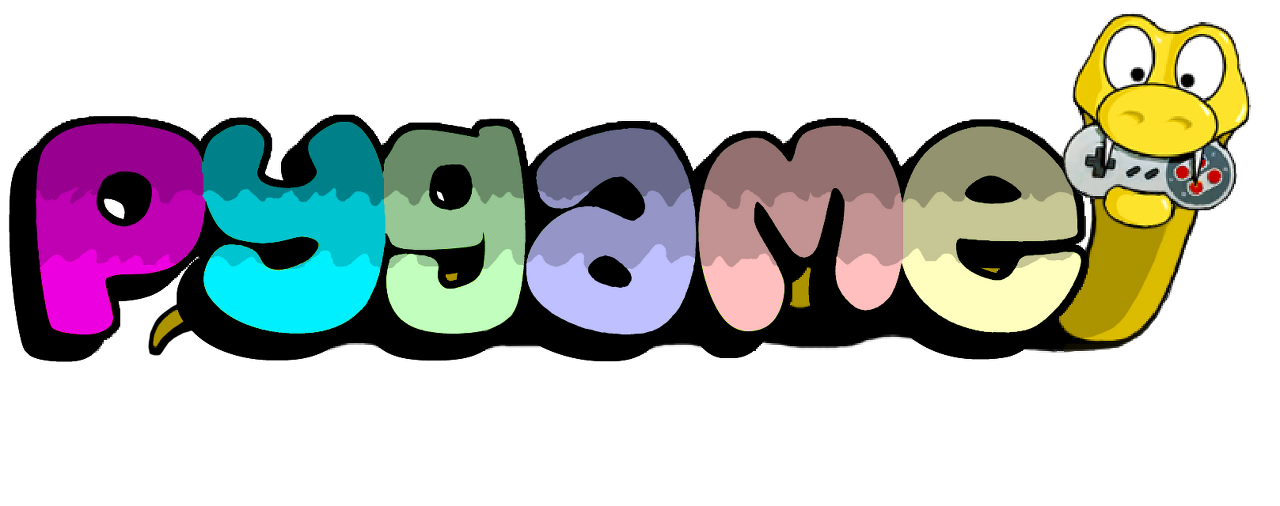
import pygame

pygame.init()

background = pygame.display.set_mode((480,360))
pygame.display.set_caption('Pygame_9')

# 폰트설정 (None = 기본 글씨체)
font_test = pygame.font.SysFont(None, 30)

play = True
while play:
    for event in pygame.event.get():
        if event.type == pygame.QUIT:
            play = False

    # 글자 설정 (.render(text내용, Bold체 여부, 색깔)
    text = font_test.render('Minding', True, (255,255,255))
    # 이미지처럼 blit으로 화면에 표시
    background.blit(text, (100,100))
    pygame.display.update()

pygame.quit()
코드 실행 결과
- pygame.font.Sysfont로 폰트를 먼저 설정해준다.
- while문 안에서 .render(text, bold, color)를 설정해준 뒤 blit으로 화면에 표시해준다.
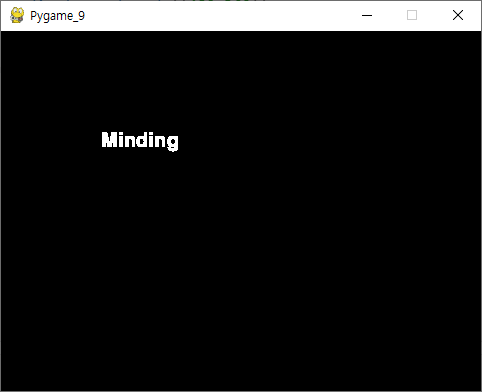
게임화면에 숫자 표시하는 법
pygame은 text 출력시 String형태만 허용하기 때문에, 숫자는 형 변환이 필요하다.
import pygame

pygame.init()

background = pygame.display.set_mode((480,360))
pygame.display.set_caption('Pygame_9')

# 폰트설정 (None = 기본 글씨체)
font_test = pygame.font.SysFont(None, 30)
score = 10

play = True
while play:
    for event in pygame.event.get():
        if event.type == pygame.QUIT:
            play = False

    # pygame에서의 text는 str만 허용하므로 형 변환 필요
    text = font_test.render(str(score), True, (255,255,255))
    background.blit(text, (100,100))
    pygame.display.update()

pygame.quit()
코드 실행 결과
- int형의 변수를 str()로 감싸준다.
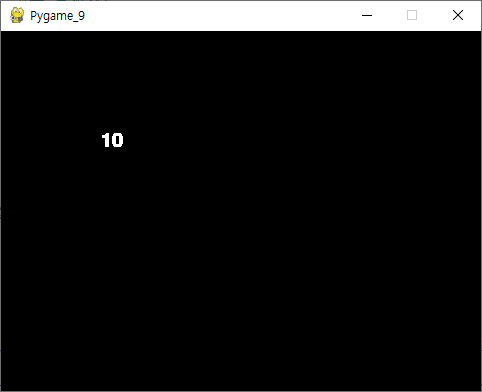
펑고게임에 적용하기
이전 포스팅까지 만들고 있던 펑고게임에 점수를 추가해보았다.
import pygame
import numpy as np

pygame.init()

background = pygame.display.set_mode((550, 382)) # 배경 이미지에 맞추어 화면크기 설정함
pygame.display.set_caption('PYGAME_9')

# 이미지 파일 준비
image_bg = pygame.image.load('./image/fungo.png')
image_ball = pygame.image.load('./image/ball_small.png')
image_glove = pygame.image.load('./image/glove_small.png')

# 배경의 사이즈 가져오기
size_bg_width = background.get_size()[0]
size_bg_height = background.get_size()[1]

# glove의 사이즈 가져오기
size_glove_width = image_glove.get_rect().size[0]
size_glove_height = image_glove.get_rect().size[1]

# glove의 좌표값 설정하기
x_pos_glove = size_bg_width/2 - size_glove_width/2 # x좌표값 상 중앙
y_pos_glove = size_bg_height - size_glove_height # 맨 아래 (전체 높이에서 이미지 높이 만큼 뺀 값)

# 키보드 움직임에 의한 좌표 변수 (양 옆으로만 움직일 것이므로 x좌표만)
to_x = 0

# ball의 사이즈 가져오기 (가로, 세로)
size_ball_width = image_ball.get_rect().size[0]
size_ball_height = image_ball.get_rect().size[1]

# ball의 좌표값 설정하기
x_pos_ball = size_bg_width/2 - size_ball_width/2 # 가운데
y_pos_ball = 0 # 맨 위

# ball의 x,y 축 속도 변수 (좌표에 더해줄 목적)
x_speed_ball = 1
y_speed_ball = 1

# 점수 변수 추가 및 폰트 설정
score = 0
score_font = pygame.font.SysFont(None, 50)

play = True
while play:
    for event in pygame.event.get():
        if event.type == pygame.QUIT:
            play = False
        if event.type == pygame.KEYDOWN: # 키보드가 눌렸을때
            if event.key == pygame.K_RIGHT:
                to_x = 1
            elif event.key == pygame.K_LEFT:
                to_x = -1
        if event.type == pygame.KEYUP: # 키보드를 뗐을때
            if event.key == pygame.K_RIGHT:
                to_x = 0
            elif event.key == pygame.K_LEFT:
                to_x = 0

    # glove가 화면 밖으로 벗어나지 않도록 제한
    if x_pos_glove < 0:
        x_pos_glove = 0
    elif x_pos_glove > size_bg_width - size_glove_width:
        x_pos_glove = size_bg_width - size_glove_width
    else:
        x_pos_glove += to_x

    x_pos_ball += x_speed_ball
    y_pos_ball += y_speed_ball

    # x좌표값을 제한하고 speed변수를 음수로 바꿔 방향 전환하기
    if x_pos_ball <= 0:
        x_speed_ball = -x_speed_ball
        x_pos_ball = 0
    elif x_pos_ball >= size_bg_width - size_ball_width:
        x_speed_ball = -x_speed_ball
        x_pos_ball = size_bg_width - size_ball_width

    if y_pos_ball <= 0:
        y_speed_ball = -y_speed_ball
        y_pos_ball = 0
    elif y_pos_ball >= size_bg_height-size_ball_height:
        y_speed_ball = -y_speed_ball
        y_pos_ball = size_bg_height-size_ball_height

    # ball의 현재 위치를 업데이트 하기위해 이미지의 좌표를 불러와 업데이트
    rect_ball = image_ball.get_rect()
    # ball의 왼쪽 위 가장자리 좌표를 업데이트
    rect_ball.left = x_pos_ball
    rect_ball.top = y_pos_ball

    rect_glove = image_glove.get_rect()
    rect_glove.left = x_pos_glove
    rect_glove.top = y_pos_glove

    if rect_glove.colliderect(rect_ball): # 객체 충돌 시 랜덤한 곳에서 새로운 공 등장
        x_pos_ball = np.random.randint(550) # 배경화면의 가로길이(550) 중 랜덤한 정수 하나 반환
        y_pos_ball = 0 # 맨 위
        score += 1 # 점수 1점 추가

    # 이미지 삽입
    background.blit(image_bg, (0,0))
    background.blit(image_ball, (x_pos_ball, y_pos_ball))
    background.blit(image_glove, (x_pos_glove, y_pos_glove))

    # 점수 삽입
    score_text = score_font.render('점수 : {}'.format(str(score)), True, (255,255,255))
    background.blit(score_text, (10,10))
    pygame.display.update()

pygame.quit()
객체 충돌때 마다 score 변수에 1을 추가해주었다. 그런데...
- 기본 폰트는 한글을 지원하지 않아 한글이 적용되는 폰트로 변경
- 폰트의 종류는 print(pygame.font.get_fonts())로 알 수 있다.
# 내 컴퓨터에 저장되어 있는 폰트 출력하기 (pygame에 적용가능한 폰트 찾기)
print(pygame.font.get_fonts())

>>>
['arial', 'arialblack', 'bahnschrift', 'calibri', 'cambria' ... '불탄고딕b', 'g마켓산스ttf', 'g마켓산스ttfmedium']- 무슨 작업을 해도 평타는 친다는 g마켓산스로 선택했다.
- 위 폰트 설정 부분에 None을 'g마켓산스ttfmedium'으로 교체했다.
시연 영상
플래시 미니게임 정도까지는 온 것 같다 ㅎㅎ
728x90
'Minding's Programming > Pygame' 카테고리의 다른 글
| [Pygame] 11. 게임오버 화면 추가 및 게임 종료하기 (0) | 2023.02.09 |
|---|---|
| [Pygame] 09. 이미지(캐릭터) 객체끼리 충돌하기 (0) | 2023.02.07 |
| [Pygame] 08. 이미지 객체 추가 및 키보드로 움직이기 (0) | 2023.02.06 |
| [Pygame] 07. 이미지 벽에 닿았을 때 튕기기 (0) | 2023.02.05 |
| [Pygame] 06. 키보드와 마우스로 이미지 움직이기 (0) | 2023.02.04 |


